
ArangoDB v2.8 reached End of Life (EOL) and is no longer supported.
This documentation is outdated. Please see the most recent version here: Try latest
Foxx in a nutshell
Quick navigation
- Quick start
- Create a new Application
- Interactive Documentation
- Developing in Foxx
- Foxx folder structure
- List content of a collection
- Create a new document
- Read a single document
- Update a document
- Delete a document
- Execute a query
- Conclusion
Quick Start
You can follow this tutorial using ArangoDBs web interface.
Start the interface from http://localhost:8529 (default configuration) and click on the Applications tab on the top.
- Note
- Before we start: Please Install and run ArangoDB in version 2.5 or newer
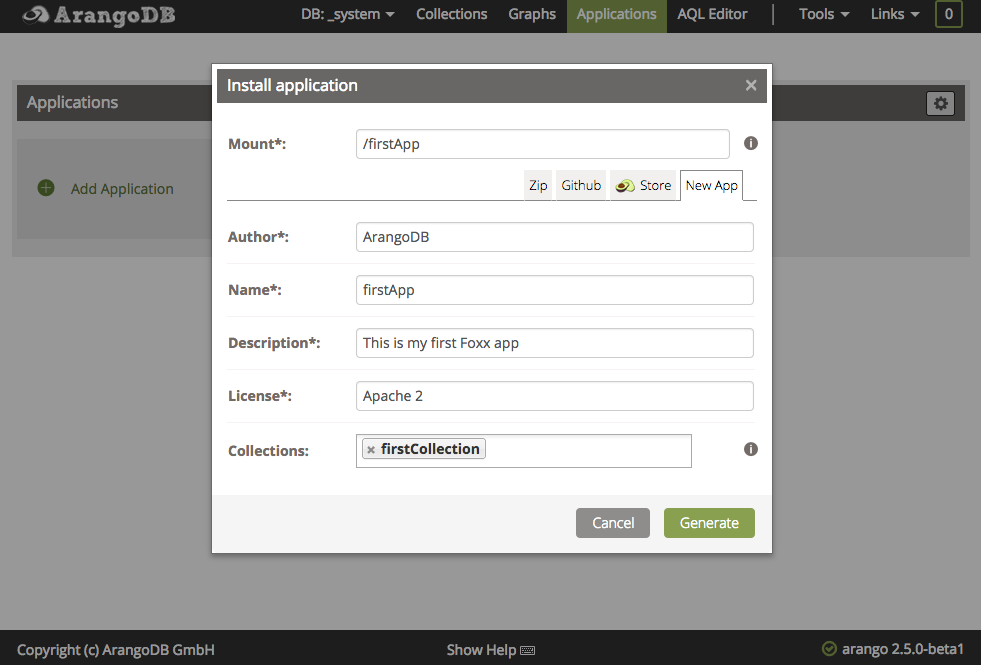
Create a new application
- Click on
Add Application. - In the New App tab, you will be offered a dialog to fill in some information about your application.
- For this tutorial we will use the following information:
- Author: ArangoDB
- Name: firstApp
- Description: This is my first Foxx app
- License: Apache 2
- Collections: firstCollection
- Click Generate
Some details you should know
- The information entered here is basically meta information that will be displayed in the web interface.
Collectionswill be created for you and are local to your Foxx application. For all collections CRUD endpoints will be generated for you.- You can define up to 8 collections. But for this tutorial stick to exactly one.
Interactive documentation
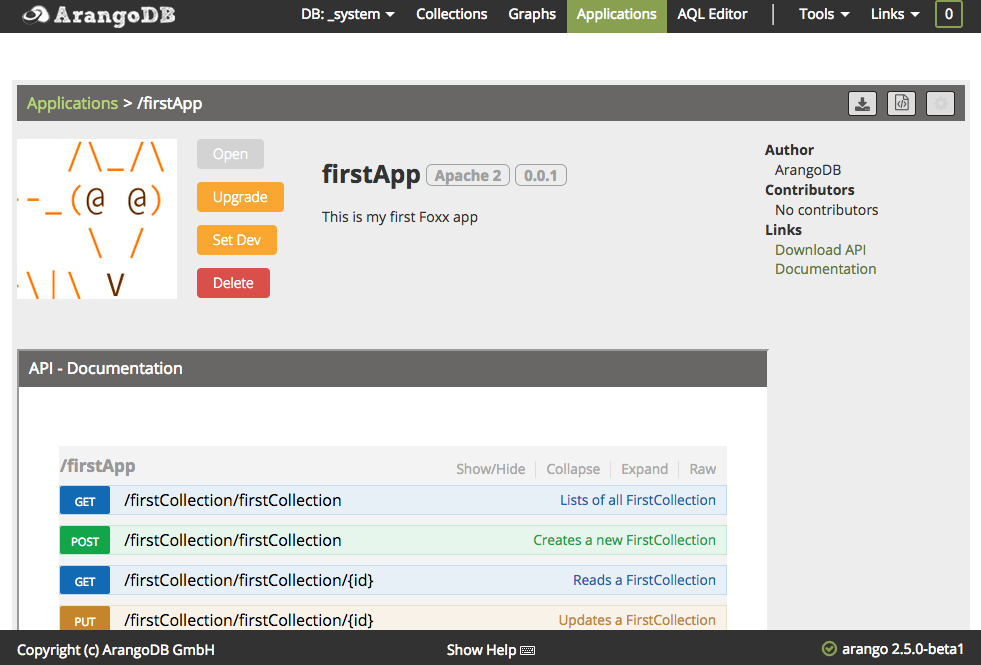
Now you should see your new application in the list of installed applications. Clicking on it will lead you to the details page. This page provides the meta information about the application entered in the generating dialog. You can modify this information in the applications manifest file. Additionally, the interactive swagger-documentation could be used to test the app. Whenever we modify something in the app during this tutorial it should be visible in this documentation. So you can directly test if your modification has worked or not.
Developing in Foxx
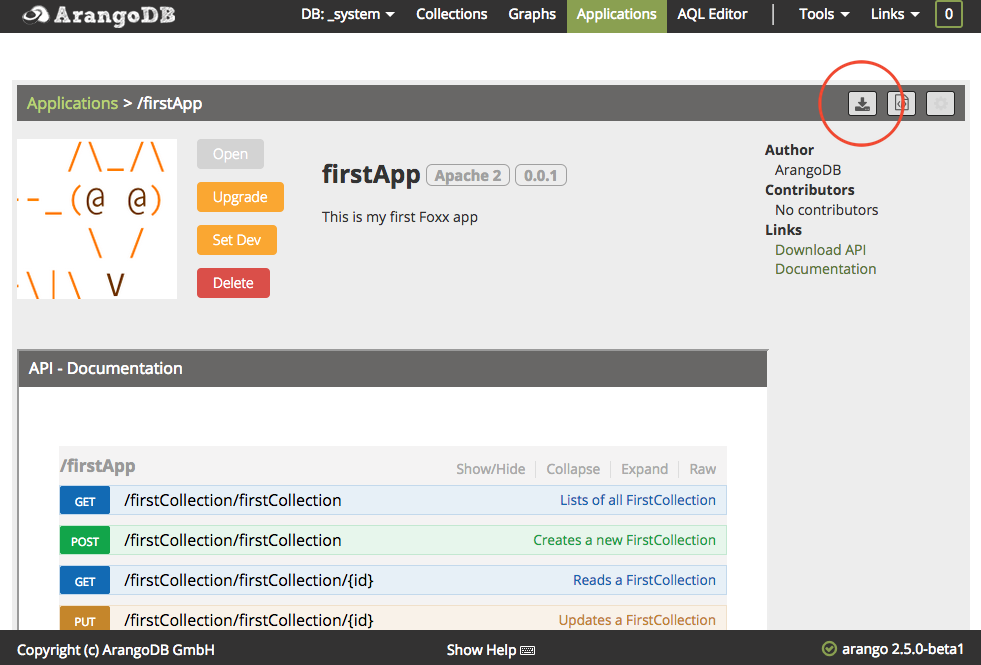
In order to develop your Foxx you now have two options. If you do not have access to the file-system of your ArangoDB instance you can only pick option 1).
- Modify the files locally.
- Download the application’s source in a zip archive to your local file-system by clicking on the download button.
- Extracted the file.
- Later in this tutorial we will modify the files.
- After this modifications you have to repack the sources into a zip file.
- You can then click on
upgrade, selectZipand upload your zip file. - This will replace the Foxx stored in ArangoDB by your own implementation.
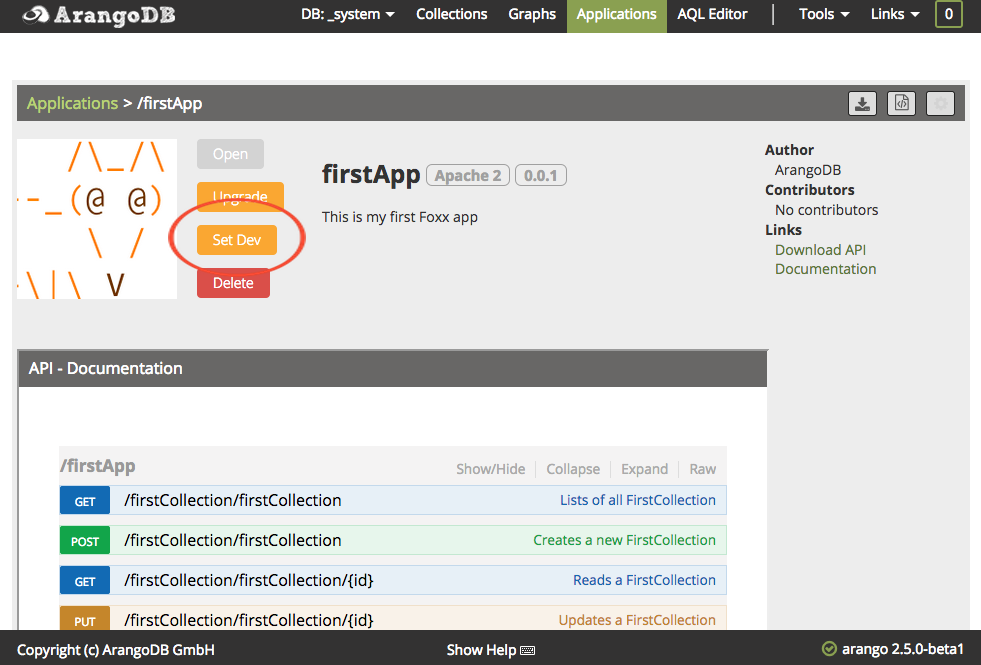
- Use Foxx development mode.
- Activate the development mode by clicking on
Set Dev. - The Web Interface will print the folder containing the sources of your Application.
- Open this folder to modify the files.
- All changes to these files will be applied directly as long as the development mode is active.
- Deactivate the development mode by clicking on
Set Pro.
- Activate the development mode by clicking on
App folder structure
If you have opened the folder containing your App the folder structure should be the following:
unix>tree app
app
├── controllers
│   └── firstCollection.js
├── manifest.json
├── models
│   └── FirstCollection.js
├── repositories
│   └── firstCollection.js
└── scripts
    ├── setup.js
        └── teardown.js

4 directories, 6 files
controllersdefine endpoints for your requests.repositoriesdefine collections used by this application and allow to attach custom code to them.modelsdefine object models to be stored in collections. This allows to execute object validation before storing them in your database.scriptscontain code that will be executed on specific events. E.g. setup on application install and teardown on application uninstall.manifest.jsoncontains meta information and tells ArangoDB where to find the files for this application. See in the second screenshot.
For this tutorial we will only work with the file: controllers/firstCollection.js
Now open your favorite editor and have a deeper look into the code.
- Note
- Most of the code described in this tutorial is already generated
List content of a collection
The following route lists all elements of our collection:
GET http://localhost:8529/_db/_system/firstApp/firstCollection/firstCollection
It is defined in the source in the following way:
/** Lists of all FirstCollection
 *
 * This function simply returns the list of all FirstCollection.
 */
controller.get('/firstCollection', function (req, res) {
  res.json(_.map(FirstCollection_repo.all(), function (model) {
    return model.forClient();
  }));
});
Some details you should know about the code:
- The
controllergives you options to create routes. controller.get(path, callback)creates aGETrequest handler onpath. It will executecallbackwhenever triggered.FirstCollection_repois an instance of firstCollection_.map(collection.all(), function())transforms all documents in the collection to readable JSON.res.json()creates a JSON response for the client.- The comment above the function will generate a nice documentation.
Create a new document
This code-snippet defines the route to create a new document in our collection:
POST http://localhost:8529/_db/_system/firstApp/firstCollection/firstCollection
/** Creates a new FirstCollection
 *
 * Creates a new FirstCollection-Item. The information has to be in the
 * requestBody.
 */
controller.post('/firstCollection', function (req, res) {
  var firstCollection = req.params('firstCollection');
  res.json(FirstCollection_repo.save(firstCollection).forClient());
}).bodyParam('firstCollection', 'The FirstCollection you want to create', FirstCollection);
This route is used to store JSON objects following a strict pattern into the collection.
The pattern is defined by the Model given in the file models/FirstCollection.js:
(function () {
  'use strict';
  var Foxx = require('org/arangodb/foxx'),
  Joi = require('joi'),
  Model;

  Model = Foxx.Model.extend({
    schema: {
      // Describe the attributes with Joi here
      '_key': Joi.string(),
    }
  });

  exports.Model = Model;
}());
This defines that only documents having a _key can be stored and nothing else.
Now lets also allow to store an optional name by changing the following lines:
  Model = Foxx.Model.extend({
    schema: {
      // Describe the attributes with Joi here
      '_key': Joi.string(),
      'name': Joi.string().optional(),
    }
  });
To test it you can for example store the following object. Note the _key is the internal identifier for this object and can either be user-defined or will be generated otherwise. In this tutorial we will refer to this key again.
{
  "_key": "123456",
  "name": "Alice"
}
To test the route you can copy & paste this object into the interactive documentation or execute the following line in your shell:
unix> curl -X POST http://localhost:8529/_db/_system/firstApp/firstCollection/firstCollection --data '{"_key":"123456", "name":"Alice"}'
{"_key":"123456","name":"Alice"}
You can also try to store documents having different attributes or not having name.
Some details you should know about the code:
controller.post(path, callback)creates aPOSTrequest handler onpath. It will executecallbackwhenever triggered.req.params()allows to access all parameters, including the body, sent with the request.FirstCollection_repo.save()will store a JSON document into our collectionforClient()will create JSON output for the clientbodyParamdefines that there is an body expected in each request and the body should correspond to a valid FirstCollection object. All other bodies will be rejected and a documentation will be generated for this body. It can be accessed in the request parameters via it’s name ‘firstCollection’
Read a single document
This route allows to read a specific document in our collection, identified by Id:
GET http://localhost:8529/_db/_system/firstApp/firstCollection/firstCollection/:id
/** Reads a FirstCollection
 *
 * Reads a FirstCollection-Item.
 */
controller.get('/firstCollection/:id', function (req, res) {
  var id = req.params('id');
  res.json(FirstCollection_repo.byId(id).forClient());
}).pathParam('id', {
  description: 'The id of the FirstCollection-Item',
  type: 'string'
});
This route now allows us to read exactly one specific document stored in our collection. In the last route we have inserted the “Alice” document, now we want to get that one back. In order to achieve this we have to replace the “_id” with the “_key” we have stored earlier. In the interactive documentation there is a text field to enter the value, or you can execute the following CURL command:
unix> curl -X GET http://localhost:8529/_db/_system/firstApp/firstCollection/firstCollection/123456
{"_key":"123456","name":"Alice"}
controller.get(path, callback)creates aGETrequest handler onpath. It will executecallbackwhenever triggered.- The
:idin the path defines that this part of the route will be interpreted as a parameter with the name id. byIdfetches a document from the collection by it’s unique identifier:_keypathParamdocuments the path parameteridas described in the path. It also restricts it to be a string.
Update a document
This code shows how to update a specific document in our collection. The API call is:
GET http://localhost:8529/_db/_system/firstApp/firstCollection/firstCollection/:id
/** Updates a FirstCollection
 *
 * Changes a FirstCollection-Item. The information has to be in the
 * requestBody.
 */
controller.put('/firstCollection/:id', function (req, res) {
  var id = req.params('id'),
    firstCollection = req.params('firstCollection');
  res.json(FirstCollection_repo.replaceById(id, firstCollection));
}).pathParam('id', {
  description: 'The id of the FirstCollection-Item',
  type: 'string'
}).bodyParam('firstCollection', 'The FirstCollection you want your old one to be replaced with', FirstCollection);
This route allows us to replace one specific document. To test it let’s replace “Alice” with “Bob” by filling the input field in the documentation with:
{
  "name": "Bob"
}
Or sending the following CURL request:
unix> curl -X PUT http://localhost:8529/_db/_system/firstApp/firstCollection/firstCollection/123456 --data '{"name": "Bob"}'
{"_id":"firstApp_firstCollection/123456","_rev":"13346908308","_oldRev":"13267150996","_key":"123456"}
Note here: The _revand _oldRev values are generated by ArangoDB and can be used to validate if cached versions of the document are still up-to-date
Now let us read the document again using the GET request from before. It shall return “Bob” now:
unix> curl -X GET http://localhost:8529/_db/_system/firstApp/firstCollection/firstCollection/123456
{"_key":"123456","name":"Bob"}
Some details you should now about the code:
controller.put(path, callback)creates aPUTrequest handler onpath. It will executecallbackwhenever triggered.replaceByIdoverwrites a document from the collection with a newer version.
Delete a document
This call allows to delete a specific document in our collection:
DELETE http://localhost:8529/_db/_system/firstApp/firstCollection/firstCollection/:id
The corresponding controller function is just a few lines:
/** Removes a FirstCollection
 *
 * Removes a FirstCollection-Item.
 */
controller.del('/firstCollection/:id', function (req, res) {
  var id = req.params('id');
  FirstCollection_repo.removeById(id);
  res.json({ success: true });
}).pathParam('id', {
  description: 'The ID of the FirstCollection-Item',
  type: 'string'
}).errorResponse(ArangoError, 404, 'The document could not be found');
Let’s also test this route:
unix> curl -X DELETE http://localhost:8529/_db/_system/firstApp/firstCollection/firstCollection/123456
{"success":true}
unix> curl -X GET http://localhost:8529/_db/_system/firstApp/firstCollection/firstCollection/123456
{"error":"document not found"}
The document is gone now, if you are using development mode you will also receive the stacktrace for the error.
Some details you should now about the code:
controller.del(path, callback)creates aDELETErequest handler onpath. It will executecallbackwhenever triggered.removeByIdwill delete a document from the collection.errorResponsedefines the message that should be delivered to the client whenever there was an error. In this case the user will get a classical404.- If no
errorResponseis given a internal500will be returned by the server.
Adding a new route / execute a query
We now want to add some functionality, a simple search query. First we create an endpoint that allows to execute a simple AQL query.
The query will search for all documents having a specific name attribute.
- Note
- This part of the code is not generated. You can just add it after all the other routes.
GET http://localhost:8529/_db/_system/firstApp/firstCollection/byName/:name
var db = require('org/arangodb').db;
var searchQuery = 'FOR x IN @@collection FILTER x.name == @name RETURN x';

/** Search a FirstCollection by name
 *
 * Searches for a FirstCollection-Item
 * with a specific name attribute.
 */
controller.get('/firstCollection/byName/:name', function (req, res) {
  res.json(
    db._query(searchQuery, {
      '@collection': FirstCollection_repo.collection.name(),
      'name': req.params('name')
    }).toArray()
  );
}).pathParam('name', {
  type: joi.string().required().description('The value to search for')
});
This query searches for all documents that have the given name attribute. In order to test it let us install several instances of “Alice” in the POST route:
{
  "name": "Alice"
}
unix> curl -X POST http://localhost:8529/_db/_system/firstApp/firstCollection/firstCollection --data '{"name":"Alice"}'
unix> curl -X POST http://localhost:8529/_db/_system/firstApp/firstCollection/firstCollection --data '{"name":"Alice"}'
unix> curl -X POST http://localhost:8529/_db/_system/firstApp/firstCollection/firstCollection --data '{"name":"Alice"}'
unix> curl -X POST http://localhost:8529/_db/_system/firstApp/firstCollection/firstCollection --data '{"name":"Alice"}'
unix> curl -X POST http://localhost:8529/_db/_system/firstApp/firstCollection/firstCollection --data '{"name":"Alice"}'
unix> curl -X POST http://localhost:8529/_db/_system/firstApp/firstCollection/firstCollection --data '{"name":"Alice"}'
And now let’s issue the query with Alice
unix> curl -X GET http://localhost:8529/_db/_system/firstApp/firstCollection/firstCollection/byName/Alice | json_pp
[
  {
    "_key" : "15352375444",
    "_rev" : "15352375444",
    "name" : "Alice",
    "_id" : "firstApp_firstCollection/15352375444"
  },
  {
    "_key" : "15346346132",
    "_rev" : "15346346132",
    "name" : "Alice",
    "_id" : "firstApp_firstCollection/15346346132"
  },
  {
    "name" : "Alice",
    "_id" : "firstApp_firstCollection/15344380052",
    "_rev" : "15344380052",
    "_key" : "15344380052"
  },
  {
    "_key" : "15341824148",
    "_rev" : "15341824148",
    "name" : "Alice",
    "_id" : "firstApp_firstCollection/15341824148"
  },
  {
    "_key" : "15350343828",
    "_rev" : "15350343828",
    "name" : "Alice",
    "_id" : "firstApp_firstCollection/15350343828"
  },
  {
    "_key" : "15348377748",
    "_rev" : "15348377748",
    "_id" : "firstApp_firstCollection/15348377748",
    "name" : "Alice"
  }
]
Some details you should know about the code:
dbandsearchQueryare global variables available in all routes. Be careful: Foxx is multithreaded, writing to global variables will not be propagated to other threads. If you need shared information store it in a collection.db._query().toArray()executes an AQL query on the server and evaluates it directly to an array.@collectionis a bindParameter for collections and will be replaced in the query.nameis a bindParameter for a variable value and will be replaced in the query.
Conclusion
Now we have managed to create a very basic CRUD based Foxx. It is a REST-based wrapper around the interface of one of ArangoDBs collections and you can now start to include custom functionality into it. The first custom function we have created already is the byName query. It has stored an AQL on the server-side keeping your application clean of it. Now you can also access this query from several applications increasing the re-usability of code.